Prozam painting guides
Paint Preparation
Did you know that 90% of paint failures are caused by bad paint application, poor paint preparation or poor workmanship? Here’s a simple guide on how to prepare paint, prepare a room for painting and how to prepare mould or fungus infected areas for painting.
How to prepare paint
- Open the can of paint with a paint-can opener or a flat screwdriver. Don’t force the lid open because this could bend the lid.
- Stir the paint with a stick that is long enough to reach the bottom of the paint bucket.
- Don’t thin the paint unless it is absolutely necessary. Prozam Paints are ready to be used straight from the can.
- Mix the paint!
- When you’re done with the paint, seal the can!
How to prepare a room for painting
- Move your furniture into the centre of the room and cover the furniture with drop clothes. Put masking tape around doors, windows and wall furnishings.
- Turn off air conditioning or heating while painting.
- If there is loose or flaky paint on the walls, sand the walls down before continuing with a new coat of paint.
- Fill nail and screw holes with Profilla.
- Turn off the electricity in the room and remove the cover plates from all electrical fixtures and switches. Put masking tape over these switches.
- Remove air-conditioning vent covers
How to prepare mould or fungus infected areas for painting:
Before painting all traces of mould and fungus must be removed. Apply liberally Anti-Fungal Wash to affected areas. For dense growth a second application may be necessary to ensure a clear area. All areas must be thoroughly washed with water and dried before any application of paint. In most cases a coat of Prozam Dampcoat should be applied.
Painting Tips
Start Out Right
You'll enjoy the job more if you get everything together at the start. Organize a tool station in the middle of the area you'll be working in. Gather together your paint, brushes, rollers, hammers, screwdrivers, plastic bags, plastic wrap, rags, paint can opener, and drop cloths.
Plan a Day for Prep
Don't try to get everything done in one day. Use the day before painting day to gather furniture in the center of the room, patch cracks and holes, put painter's masking tape around doors and windows, and cover wall and ceiling light fixtures (light bulbs removed, of course!) with large plastic bags.
Clear the Decks
If you can, clear out all the furniture and accessories. Take everything off the walls. If you can't move everything out, place the furniture and lamps in the middle of the room and cover them with a good drop cloth. Be sure that you tape the cloth around the furniture. Then put a second cover of plastic or old sheet over everything.
Remove All Hardware
It may seem easier to paint around door knobs or cabinet hinges, but unless you're a professional, very experienced painter, you're bound to get drips around. So carry around some zip top bags and remove all cabinet knobs and hinges, door knobs, light switch plates and outlet covers, and light fixtures. Place the pieces together in separate bags and clearly mark the contents and location (top left cabinet, bathroom door, etc) you took them from. This is a great time to clean the hardware! Put them back when you're done painting.
Get Yourself Ready
No matter how hard you try, you're bound to get drips (or more) of paint on whatever you're wearing. So take off all jewelry. Reserve some old, but comfortable, clothes for your painting jobs. Slip-on shoes are easy to take off if you need to leave the room. You won't have to worry about tracking drops of paint into other rooms. When you paint the ceiling, put a scarf, shower cap, or old baseball hat over your hair and some plastic over your eyeglasses.
Don't Paint Over Problem Walls
If your walls have holes or cracks, fix them before you start with the paint.
Natural or Synthetic Brushes
Paint brushes with natural bristles are meant for oil-based paints. Natural bristles will soak up the water and go limp in water-based paints. The newer synthetic bristles were designed for water-based or latex paints, but can be used for anything. Densely packed bristles that taper to a chisel edge help with painting a straight edge, cutting in or tipping. Split ends or "flags" hold more paint and spread it more evenly and smoothly. Choose the right brush for your job.
Foam Brushes and Rollers
Foam brushes come in many widths, are inexpensive, and are great for small jobs or touch-ups. Foam paint rollers work well, don't spatter the paint, and are easy to use when you want a really smooth wall. Don't try them on rough surfaces, though, as they will not hold up.
Paint Rollers
A paint roller with a plastic core will last longer than one with a cardboard core. Select a roller "nap" (fullness of the covering) according to the texture on your walls. Use a flat, smooth roller for flat, smooth walls and a thicker, more plush roller for rough textured walls.
Water-Based or Latex Paint
New latex paints are formulated to be environmentally-friendly. Drying time is short (usually about 1 hour) and clean ups are easy with water. Apply water-based paints with rollers or synthetic bristle brushes. Latex paints tend to get a "skin" of paint in the can when they begin to dry out, so keep the can covered as much as possible. Pour paint into another container to work from and close the can.
Oil-Based Paint
Most professional painters prefer oil-based paints, especially for cabinets, furniture, and trim. New formulations do not harm the environment and are not toxic. Because they dry more slowly, oil-based paints allow for better coverage and work well in warm, dry climates where water-based paints would dry too fast. Apply oil-based paints with pads, rollers, or natural bristle brushes. Clean up with paint thinner or other solvent.
Drop Cloths
The best material for a drop cloth is a heavy canvas cloth. It's not as slippery as plastic and covers better than newspaper. Fold the cloth to fit any size room and tape down the corners to prevent paint from oozing over the edge. To prevent scratching, be sure to vacuum hardwood floors before you put the drop cloth down.
Paint Problems
Blistering
Nothing is as discouraging as finishing a painting project, only to have paint blisters or bubbles appear in the new finish. This type of problem can occur in any type of paint, butlatex and acrylic formulas are more susceptible. Bubbling and blistering occur indoors and out, often with no apparent cause. Proper preparation is the single most important thing you can do to avoid bubbles.
What Causes Paint Blisters and Bubbles?
Although the end result is the same, blisters and bubbles are actually caused by two different things. Blistering occurs when the upper layer of paint loses adhesion and separates from older layers. Typically, this happens after the paint has dried completely, and there are no good guidelines for determining if or when it will occur. The problem can crop up within a day, or not until a year later.
The most common cause of blistering is applying paint to a damp or wet surface. Allow the substrate to dry completely before priming and painting. If there is a continual moisture problem (in a leaky basement, for example), it must be corrected before painting.
It's also important to let the paint dry before exposing it to wet conditions. The weather channel is your friend! Avoid painting within four hours of a rainstorm; high humidity often causes blisters (sometimes water-filled) to form. If the surface drys out quickly, sometimes these will disappear. If a bubble remains after the surface dries, however, you'll need to scrape it off and repaint.
In other cases, blistering is caused by applying paint to a dirty or incompatibly finished surface. As the paint dries, it shrinks slightly, pulling up poorly adhered sections of old paint. It's important to thoroughly clean walls (both interior and exterior) before painting. Never apply oil-based paint over a latex base. It is possible to use latex paint over oil based primers and paints, but it's better to stick with one type of formula. If your siding has been treated with linseed oil in the past, prime and paint with oil-based products.
Bubbles form as the result of a chemical reaction. This problem is far more common when paint is applied to a hot surface. Essentially, the top layer of paint dries, forming a barrier that prevents the solvents from escaping easily. At the same time, the hot surface causes the solvents to vaporize. These expanding gases put enough pressure on the paint to force it away from the substrate, creating a bubble. This occurs early on, during the initial drying phase.
Avoid painting in hot weather (above 85°F) or in direct sunlight. If these conditions can't be avoided, use a paint conditioner to slow drying. As with any paint problem, the best defense is proper preparation. If you're already faced with a paint blistering or bubbling problem, it can be corrected by removing the damaged paint, smoothing the surface and repainting. Just make sure to correct the underlying cause of the problem, or it will recur.
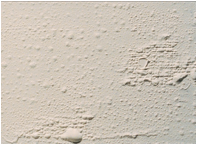
 Chalking Paint
Chalking is identifiable as a fine chalky powder that forms on the surface of a paint film. Although some chalking is a normal way paints self clean when exposed to the sun and rain, excessive chalking can be a paint failure. In dry arid climates where there is little rain, chalking can become excessive. Chalking is actually the paint pigment released by the paint binders which have been broken down by exposure to the weather. Chalking is especially typical of very light colored flat paints, especially lesser quality oil based paints containing high levels of pigment extenders. When chalking gets severe it may run off onto and stain surrounding construction
Potential Causes:
- Use of cheaper quality exterior paint containing high levels of pigment extenders.
- Improper paint was used in an exterior application (such as an interior paint).
- Lower quality factory finished aluminum siding.
- Over-thinning paint.
- Not properly sealing a porous surface before painting.
Possible Repairs:
- Chalking is considered dirt and must be removed before repainting.
- Remove chalking by power washing or scrubbing with a cleaning solution and rinse with clean water.
- Let dry and paint with a high quality latex house paint.
- To clean brick areas stained by chalking runoff the masonry should be scrubbed with a specialized masonry cleaning solution. If staining persists, a professional cleaning contractor may be required to clean the brick.
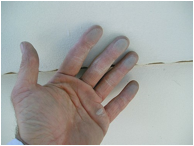
Cracking or Flaking Paint
Paint can crack and flake, sometimes revealing the substrate.
 What Causes It?
Dry paint can split through at least one coat, which will lead to complete failure of the paint. Early on, the problem appears as hairline cracks. Later, flaking of paint chips occurs.
A variety of causes exist for cracking or flaking of paint. First, if lower-quality paint has been applied to the surface, it will have inadequate adhesion and flexibility. Another cause is that the paint was spread too thin on the surface.
Poor surface preparation, especially when the paint is applied to bare wood without priming, can also cause this problem. Finally, painting under cool or windy conditions can make latex paint dry too fast, causing it to crack.
How to Solve It
If the cracking does not go down to the substrate, you may be able to correct it by removing the loose or flaking paint with a scraper or wire brush, sanding the area to feather the edges, priming any bare spots, and repainting it.
If the cracking goes down to the substrate, remove all of the paint by scraping and sanding or use a heat gun. Then prime and repaint with a quality exterior paint.
Alligatoring and Checking
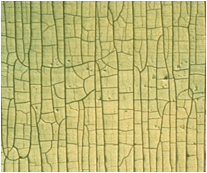
"Alligatoring" is a failure in the paint film where it takes on a cracking pattern of deep relief resembling a reptile's skin, such as that of an alligator. "Checking" is a similar failure but is less severe and is characterized by long, fairly evenly spaced cracks in the paint film having shallow relief or depth. Occasionally checking may become severe in some areas and a deeper crack or split in the paint will occur.
Potential Causes (Alligatoring):
- A second coat of paint was applied over a first coat of primer or paint base coat before it dried.
- A second coat of paint was applied over an incompatible paint such as a glossy paint or a hard oil enamel over a latex based paint.
- Oil based paints naturally aging and losing the little elasticity the paint film originally had, therefore it cracks due to fluctuations in temperature.
Potential Causes (Checking):
- Natural aging of several layers of older oil based paint. As the material having been painted shrinks and expands over time (usually wood), the paint has to move and as it loses elasticity, it checks.
Possible Repairs:
- The fix is the same for both problems.
- Remove the old paint, sand, prime and repaint with flexible latex based paint.
- Use high quality latex paint.
Peeling Paint Due to Poor Adhesion
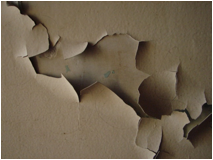 Peeling paint is a very common paint problem but can be caused either by moisture or poor adhesion. Peeling due to poor adhesion is characterized by the paint peeling and separating from an earlier paint layer (intercoat peeling) or from the substrate leaving some paint behind. Sometimes portions of earlier paint layers are visible under the curling, peeling paint layer.
- Painting over an surface with poor paint surface preparation such as being dirty, wet or shiny.
- Substrate had poor adhesion prior to being repainted.
- Applying an oil based paint over a wet surface.
- Blistering paint allowed to progress in failure.
- Lower quality paint was used.
Possible Repairs:
- Scrape away old peeling paint and feather sand affected areas.
- Spot prime bare area.
- Caulk as required with appropriate caulking product.
- Repaint with a high quality acrylic latex house paint.
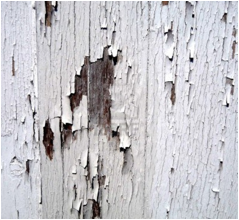
Peeling Paint Due to Exterior Moisture Under Paint Film
As mentioned in the previous section, peeling paint is a very common paint problem that can be caused either by moisture or poor adhesion. Peeling due to moisture is recognizable by large peeling sections of paint exposing bare wood underneath. Unlike peeling due to adhesion problems where peeling may be spotty, with moisture related peeling larger areas peel away often around windows, doors and gutters.
Potential Causes:
- Moisture getting behind paint film from failing or missing caulk, leaks in roof or wall systems or being too close to the ground.
- Faulty guttering or missing ventilation causing ice dams or water back up.
- Painting when the surface being painted is wet from condensation or rain.
Possible Repairs:
- Ensure proper drainage of gutters and downspouts flowing away from home.
- Eliminate cause or source of moisture by installing exhaust fans, soffit vents, siding vents, louvers, fans, and dehumidifiers.
- Repair and replace missing or damaged caulk.
- Scrape away old peeling paint and feather sand affected areas.
- Spot prime bare area.
- Caulk as required with appropriate caulking product.
- Repaint with a high quality acrylic latex house paint.
Peeling Paint Due to Interior Moisture Under Paint Film
Peeling of interior paint due to moisture is characterized by cracking and gentle peeling away of the paint from the substrate as it loses adhesion due to the moisture. Moisture originating from behind the paint film or in front and forcing its way through the paint film can create this type of paint failure.
Potential Causes:
- High humidity areas such as bathrooms, kitchens, hot tubs, wet basement areas and the like can create humidity that penetrates the paint film from the front.
- Leaking flashing around a chimney or other exterior wall / roof intersection can allow water to seep into the house and wet the plaster from behind the paint film causing the paint to separate from the substrate.
Possible Repairs:
- Ventilate high moisture areas such as bathrooms by providing an exhaust vent fan that removes humidity and discharges to the outside.
- Ensure proper ventilation of the roof and walls and soffits.
- Repair missing or damaged flashing at chimney or other wall / roof connections.
- Scrape away old peeling paint and feather sand affected areas.
- Spot prime bare area.
- Paint with high quality acrylic latex paint.